Recipes by Wade (When I'm Not Making Firearm Racks, I'm Cooking)
Corn Chowder with Venison Sausage

Estimated time till you can chow down...about an hour.
This is a simple recipe that is fun, fast, & tasteful. I like this recipe because I can cook it all by myself. And I can do it fast. I don't have to punish anyone in this process. If you like cooking as much as I do, then this is a good one you can drink a beer or 6 while cooking it...and you still can NOT screw it up. You can used canned potatoes, corn, and store bought sausage so that things are super easy, or you can use more sophisticated ingredients if you like. Either way, it's almost fail safe to make.
Makes about a gallon. Cut all ingredients in half to make about 1/2 Gallon.
1.5 lbs Peeled and diced potatoes or 4-5 cans of dices potatoes. (Cube into 1/4 to 1/2 inch pieces)
4 or 5 cans of whole kernel corn or the equivalent in fresh corn cut off the cob. (Frozen corn works fine)
1.5 - 2 pints of whole cream.
1/2 Stick of Butter
1 - 1.5 lbs of venison or pork sausage in casings sliced thinly (1/8 -1/4 inch). (You could even use shrimp or chicken...see tips below.)
1-2 teaspoons of Old Bay Seasoning
4-6 drops of liquid crab boil (To taste, but be careful due to how strong it is.)
1 Table spoon of Black pepper (I use a course grind.)
Optional Ingredients:
Pepper Flakes
Chopped celery if you like the added flavor and texture.
Onion powder if you want a little more depth of flavor (you can also add some finely diced onion if you like)
Instructions:
First, get all of your potatoes peeled and cut up and into a decent size pot that will hold everything on the ingredient list. Bring potatoes to a boil using enough water to cover them about 1/2 inch. Do not put a lid on the pot. We need this starchy water as a thickening agent, so we don't throw it out. We need the potatoes to get tender to the point of they are just starting to fall apart a little and the water is frothy white, but not so much that they just liquefy and totally break down. This usually takes about 10-20 minutes depending on how big of chunks of potatoes you chopped up. As soon as this starts getting real starchy, and the water has reduced a bit due to the evaporation, add the corn and sausage and reduce to a good simmer. If you are using canned corn, just add the corn, and hold the liquid aside if you want a thicker chowder. Let that simmer for a few minutes until your sausage is cooked through. Next, throw the butter in the pot and while its melting, add the pepper, Old Bay, and a few drops of Crab Boil liquid. I usually pour a few drops of the Crab Boil into a spoon or something just to make sure I don't pour too much into the pot...its easy to put too much Crab Boil in, and that can ruin the chowder. Lastly, pour cream in to get the concistency and taste you want. Don't worry if you put a little too much cream in, as the longer this chowder simmers, the thicker it will get. Taste it and add spices, salt, until you have it the way you like. That's it!
Tips.
In this dish, Potatoes are not the flavor, so you can add more or less without affecting the overall flavor of the dish. Just remember, the less potatoes you add, the less starch you have, and starch is what thickens the chowder.
You can add more or less corn to this also, but corn creates the overall background flavor of this. Without corn, your just making potato soup or chowder. I have put 8 cans of corn in this recipe before and it was great. You can also add a can or two of creamed corn, which will thicken things up quickly!
Add more or less sausage, or even a combination of sausages. Stay away from sweeter "breakfast style" sausages. Lean towards simple flavors or mild or even spicy sausages if that's to your liking.
If you do use chicken, you can certainly used canned chicken, or you can lightly boil a few chicken breasts until they are done, then chop them up and throw them in the pot near the end.
If you choose to put shrimp in this, its very good, but you need to put it in near the end. Smaller shrimp do great, so get whats the best deal. If you have larger shrimp, you might want to chop them into smaller pieces.
Big Ass Shrimp with Pasta
Do NOT waste your time on this recipe if you do not have or know how to make clarified butter.
This is a simple recipe, but it can get complicated fast if you are not handy in the kitchen. It is certainly not for folks who can't make mac and cheese without a recipe. However, if you know the basics of cooking, read it well & plan it out, it will be awesome!

Estimated chow down time...about 1 hour....if your organized and read this 2 times before cooking.
I recommend you read this recipe 2 times before you execute it if you want to make the 1 hour time frame...Otherwise, your daughter will be reheating pizza and your wife will be complaining. Make the "blackening" seasoning and peel the shrimp first. That will make things flow a lot better. Don't be afraid to cook the pasta next and set it aside, just keep it warm and buttered so it does not stick. Good Luck!
TIP: Get your ducks in a row before you start burning crap.
This is a great recipe, but you have to pay attention to the details to get it right. First of all, you need some big ass shrimp. 12-16 shrimp per pound is recommended. We used Red Royals from the Alabama Coast to make this recipe, but any big shrimp will do. If you have smaller shrimp, say 25-35 count per pound, it will kind-of work, but your going to probably have a tougher shrimp if you try to blacken it...so, what the heck...give it a shot. Just realize its going to be difficult not to overcook it. It's very difficult to blacken a small shrimp without overcooking it. Your also going to need 2 skillets, and a pot to boil pasta in.
TIP: It's helpful to have some one that you don't like peel the shrimp...It's a great punishment for snow flake kids also.
This recipe will feed about 3-4 peeps with the dish I have pictured and the ingredients listed below.
2 lbs of Big Ass peeled shrimp. If you want to butterfly them like I did, I recommend it, but you don't have to.
I box of Bow-tie Pasta. (You could use Penne, Ziti, or whatever actually)
1 cup of Clarified Butter (If you don't have clarified butter, stop now...don't ruin your shrimp or waste your time!)
Blackening Rub Ingredients:
(Mix all this stuff in a bowl that's big enough to toss your shrimp in, and set aside. A paper bag will work as well)
1 cup of flour (Self rising or all purpose or whatever...it does not matter. We are just using it as a blackening agent)
2-3 Tablespoons of Paprika (Blackening & Taste agent)
1-2 Tablespoons of Chili Powder (If you don't have this, add more paprika to compensate) (Blackening & Taste agent)
1-2 teaspoons of Old Bay Seasoning (Blackening & Taste agent, but more on the taste side of things)
1 Tablespoon Garlic Powder (Blackening & Taste agent)
1 Tablespoon Onion Powder (Blackening & Taste agent)
1 Tablespoon Salt (Taste agent)
1 Table spoon of Black pepper (Course or fine ground will work) (Taste Agent)
Sauce Spices:
1/4 stick of butter
2 Tablespoons of Olive oil or clarified butter
1 teaspoon old bay
1 teaspoon garlic powder or some minced or chopped garlic
Optional Ingredients:
Pepper Flakes
Some good Sausage (No joke, add some fresh sliced link sausage to the shrimp skillet and go to town! Slice it about 1/4 inch thick.)
Fresh Garlic chunks chopped or sliced and sauteed in the shrimp skillet and thrown into the sauce...
Thyme...always a good accent for shrimp, but be careful. A few leaves goes a long way. Best to sprinkle on after serving the dish.
Cilantro... Trust me, it works. Treat it as a garnish...with a lot of flavor.
Instructions:
FIRST:
Peel the shrimp. (If you have frozen shrimp, they are easier to peel when they are partially thawed)
SECOND:
Mix the "blackening spices" in a bowl or bag. Stick a wet finger in that mixture and see what it tastes like. (It should be slightly salty, powdery, peppery, and just tasty. Imagine it getting burnt on your shrimp....getting a little bitter as it blackens...yummy!) When you think you have it right, throw those big ass shrimp in there. Shake it around and coat them good and just let them sit there while your doing other stuff.
THIRD:
Get a 3rd Skillet (or pot) to make the sauce in. Whatever you use, it MUST have a lid. Turn that pot on low...like a 1 on a scale of 1-10. Put about a quarter stick of butter in it and let it melt. Add the "sauce" spices, put the lid on and let it warm up. We are not cooking the shrimp all the way when we blacken them, so we are going to have to finish cooking them in the pot... They are going to get tossed into this pot after they get blackened, and its going to finish cooking them on super low heat. This keeps them blackened on the outside, and juicy on the inside! Remember, the first batch of shrimp out of the skillet will be over cooked if the heat is too high on this pot. Keep the heat low.
FOURTH:
Get a pot of water boiling to cook the noodles and throw them in. Set a timer and put a colander in the sink. The goal here is to get the noodles out of the way and that huge pot off the stove. Once they are done, strain them and set them aside. Find a way to keep them warm. For example, put them back into the pot you cooked them in, and add few table spoons of butter or olive oil and they will hold for the next 45 minutes just fine. Stir them every now and then to make sure they don't stick together...and go about the real cooking that needs to be done.
FIFTH: NOW PAY ATTENTION HERE:
Get a Good Skillet (At least a 10-12 inch diameter skillet) that can handle some heat, add about a Tablespoon or two of that clarified butter and turn it on low to get it melted and covering the whole bottom of the skillet. We are not trying to fry the shrimp, but we do want a little bit of a puddle of butter...a puddle, not a pond...but don't use it all if you only have about a cup of it. We can only do about 8-10 shrimp at a time here with my setup. Use your judgement to portion your clarified butter. If you are like my sister who keeps a quart of clarified butter at all times, then, well, use as much as you want to...lol.
SIXTH:
When the pasta is boiled and sitting somewhere off to the side and the sauce skillet is ready (low heat) with melted butter & spices, proceed...
NOTE:
These shrimp should be RAW in the middle, but blackened on the outside when you pull them off and transfer them to the "sauce skillet". We need the super slow heat of the sauce skillet to finish cooking them without overcooking them.
RUBBER HITS THE ROAD: (Shrimp hits the skillet)
Turn the Heat up on your Clarified Butter Skillet. Clarified butter can get hotter than cooking oil without "burning" and adds the flavor we need here. If it starts to wisp smoke, you are a tad too hot. What I do is turn it up on medium high (8 on a scale of 1 to 10) and when I see it starting to smoke, I throw about 8-10 shrimps in there. Don't walk away. In about 30-60 seconds depending on the temp of your skillet, flip them when they look to be really seared and blackened on one side. Don't over do it. Shrimp cook FAST, and we are not trying to cook them, just blacken the outside of them.
As you get them "seared", move them to the "sauce skillet" ASAP. Put the lid back on the sauce skillet.
Do the same thing for the next few batches of shrimp. BE SURE to add more clarified butter to each batch and get the skillet back up the the right "slightly smoking" temperature before adding the next batch of shrimp. Repeat until you have all the shrimp in the "sauce skillet".
LAST:
Get your pasta and plate it up. Get the sauce and ladle it onto each plate. Top with the shrimp. Add Cilantro or Parsley or whatever floats your boat at this point, but your good to go!
Enjoy!!!!
Tips:
Now, if you feel you have the stove to handle 2 lbs of Big ass Shrimp all at once, and shock cooling of your skillet is not a problem, by all means, have at it. But otherwise, plan on doing about 4 batches of shrimp and dividing your clarified butter so that you do not run out of butter in the process. We are going to have to reload the butter for each batch of shrimp we do. Oh yeah....and turn on that fan above your stove.
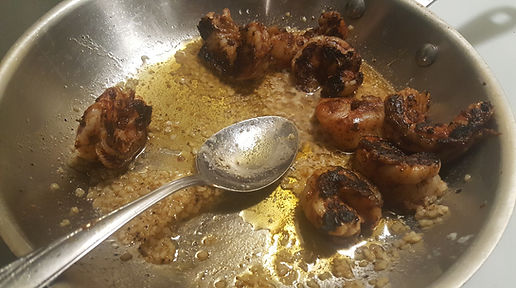
This is what your looking for after flipping your shrimp. Note how raw they are in the middle, and how they are blackening on the parts that hit your skillet. Also notice how much clarified butter is laying around in this skillet after about 1.5 minutes of cooking...almost none. Just use enough to get the job done! I count 9 Shrimps in there!

I have pulled the lid off of my sauce skillet to kinda show you what the sauce looke like. Its a runny mix of butter, minced garlic, and a few spices. Its not really a sauce, but the location where the shrimp finished cooking...with flavor! Drizzle this stuff over the pasta as you serve the shrimp.